Add giscus comments and i18n to Docusaurus
· 3 min read
Goal
This post is detailed description of adding giscus and i18n to website built by Docusaurus.
Add giscus comments feature
Preparations
- Enable discussion feature for your website's public github repo, it can be done in repo's
Settings/General/Features. This is the doc you can refer. - Configure giscus in your Github account and in section "Repository access" add only your website repo to be accessed by giscus
Get props value
- In giscus website, your can get props value in section "Configuration"
- In "Page ↔️ Discussions Mapping" part, I recommend choosing "Discussion title contains page
<title>", so that the change of url won't affect the searching result. - In "Discussion Category" part you can Announcements as recommended.
- In "Enable giscus" part, you can get the props value, you can find that if you modify settings above, the value will change accordingly.
- giscus has wrapper componet, you can use
@giscus/react
Create giscus component
install @giscus/react
pnpm install @giscus/react
create src/components/Giscus.tsx file:
import React from "react";
import Giscus from "@giscus/react";
import { useColorMode } from "@docusaurus/theme-common";

export default function GiscusComponent() {
  const { colorMode } = useColorMode();

  return (
    <Giscus
      repo="username/repo" // need to change
      repoId="R_kgxxxxxx" // need to change
      category="Announcements"
      categoryId="DIC_your category id" // need to change
      mapping="title"
      term="Welcome to @giscus/react component!"
      strict="0"
      reactionsEnabled="1"
      emitMetadata="0"
      inputPosition="bottom"
      theme={colorMode}
      lang="en"
      loading="lazy"
    />
  );
}
Add component to blogs and docs
Use swizzle command to create BlogPostItem and DocItem/Footer in src/theme directory
pnpm run swizzle @docusaurus/theme-classic BlogPostItem -- --wrap

pnpm run swizzle @docusaurus/theme-classic DocItem/Footer -- --wrap
Add GiscusComponent to BlogPostItem and DocItem
src/theme/BlogPostItem/index.js
import React from "react";
import BlogPostItem from "@theme-original/BlogPostItem";
import GiscusComponent from "@site/src/components/GiscusComponent";

export default function BlogPostItemWrapper(props) {
  return (
    <>
      <BlogPostItem {...props} />
      <GiscusComponent />
    </>
  );
}
src/theme/DocItem/Footer/index.js
import React from "react";
import Footer from "@theme-original/DocItem/Footer";
import GiscusComponent from "@site/src/components/GiscusComponent";

export default function FooterWrapper(props) {
  return (
    <>
      <GiscusComponent />
      <Footer {...props} />
    </>
  );
}
Add i18n
Actually, you can just follow this tutorial. I will give some tips about the tutorial
- you can just the code example below to configure i18n settings if you don't have complicated requirements.
docusaurus.config.js
i18n: {
    defaultLocale: 'fr',
    locales: ['en', 'fr'],
  },
-
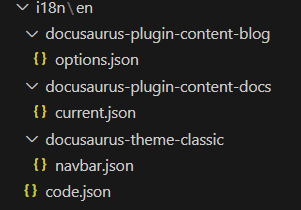
As shown in the picture, run
pnpm run write-translations --locale enwill generate a lot of files.
-
You should copy your docs and blogs to
i18n/en/docusaurus-plugin-content-docs/currentandi18n/fr/docusaurus-plugin-content-blog. -
Note: you need to create
currentdirectory by yourself
References
giscus.app
giscus-component
docusaurus swizzle
docusaurus i18n tutorial